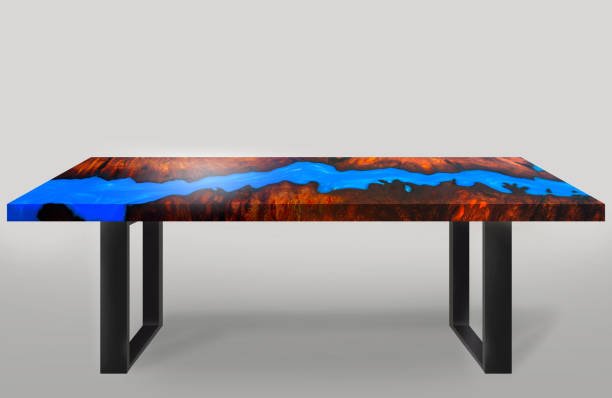
How to make Table Top Epoxy resin
-1140x300w.png "How to make Table Top Epoxy resin")
Introduction of Table Top Epoxy resin
Are you looking to design a table in a customized way? Are you also considering the factors like durability, strength, and easy maintenance? If yes, choosing epoxy resin coating from the best Indian resin suppliers can help you achieve your dreams. Based on the occasion, place, and requirements, the Table Top Epoxy resin is customised. You can use various colours, shapes & sizes to give it a unique, lively look.
To achieve fruitful results, you need to get well-versed in the basic techniques of making the tabletop epoxy resin. From knowing the tabletop thickness, size to applying the accurate coating of colours, perform each step with utmost concentration. Whether you are looking forward to layer & designing a wooden table or an epoxy resin table top with vibrant colours, MB Enterprises serves all your requirements.
Steps in making Table Top Epoxy Resin
The making of the table top epoxy resin requires the following steps.
- Start the two-part process: Prepare all the materials required for the two-part operation in advance.
- Epoxy Mixing Process: Take one part of hardener & one part for resin and mix well for 5 minutes. Pour this mixture into a different cup, add colours to it and then remix it for at least four minutes. Repeat the procedure for each pour.
- 1st Time Pouring: In the first part, pour the resin over the base using a brush to circulate it all across the place. Take a torch to remove bubbles and move it from one part to another till it appears like glass. In the second part, take the colour of your choice. Then pour the mixture into a new plastic cup. Here, you are required to add unique colours.
- 2nd Time Pouring: Use the dirty pouring technique. Take colours of your choice and keep the 4 inches pipe over a base. Transfer all colours you chose to a PVC pipe and rotate it in the desired direction. Use the torch to eliminate bubbles & let it rest for 24 hours.
- Day-2 Steps: Do a quick screening of your project & how it looks. Make sure to perform a sheet of clear coating using grits. Take a wet rag to clean the sand dust. Perform the resin mixing and pour it all across the top surface. Use the brush to flatten it all over & keep it for 24 hours resting.
- Day-3 Steps: The bottom side might have the accumulated driblet. Please clean it up thoroughly under this process. If you don't clean it, it gets hardened with time.
- Legs Addition: You can use hairpin legs or other stuff to draw the partition as per your desired direction. It expedites the entire procedure & helps to reduce the complexity of the process.
- Final Product: It's the last step to see the final product in the physical form.
Conclusion
Epoxy Resin is the best alternative for the top layer coating of your table. It adds life to the tabletop, making it look attractive. Moreover, epoxy resin allows you to design it as per your wish, I.e., river pattern, Christmas pattern, forest scene, sky pattern, etc. The themes that can be added are limitless as epoxy resin coating keeps up its originality for an extended time, the easy maintenance is now no longer an issue. Table Top epoxy resin makes the top of your table highly resistant to unwanted yet expected stains, scratches, corrosion, marks, spots, or harmful liquids. You don't need to perform the table upkeeping daily; it generally takes a few days' gaps.
MB Enterprises is the leading Indian epoxy resin manufacturer. Our products help you to refurbish your old tables as well as produce a new epoxy resin table. Whether it's old or new, both are customisable according to your requirements. We provide highly durable, stable, and high-quality epoxy resin at affordable prices starting at INR 1139/- only for 1 kg. Reach out today to take full advantage of top-class products supplied by us.


5 Comment(s)
I always wanted a surfboard coffee table with an Epoxy Resin design. I looked all over the internet to find information on hows it's made or is it even possible to make it at home. After many searches, I finally found your blog. I will try this out today itself on my surfboard coffee table. Thank you for sharing such helpful information with us. It has helped me.
Very Nice and detailed article. Keep it up, to learn and teach this art form please visit http://www.penkraftonline.in/LiveResinArtTraining
I'm interested in creating an epoxy countertop for my dirty kitchen. I'm collecting and reading articles like https://www.caesarstoneus.com/blog/epoxy-countertops-read-this-before-you-buy/ to further my knowledge. I wonder: how different are these steps to making an epoxy countertop? As a first-timer for epoxy, what do you think are the things that I should know about creating an epoxy countertop?
Epoxy use
https://xn--2e0bm0vtziojb26dzsughc.isweb.co.kr
Leave a Comment